When migrating a website to a new Linux VPS, Windows Cloud VPS, or dedicated server, testing database connections, WordPress site URLs, and SSL certificates before changing public DNS nameservers prevents public downtime. While legacy hosting panels offered temporary URLs (like http://server-ip/~username/), modern CMS platforms (WordPress, Magento, Laravel) break under temporary paths because internal asset URLs and database queries rely on the canonical domain name.
The industry-standard solution is modifying your local hosts file. This tells your personal computer to resolve your domain directly to your new server IP address, allowing you to browse and test your live website privately before cutting over public DNS. If you are also configuring server network adapters, see our guide on How to Configure a Static IP Address in Linux.
How the local hosts file works
Every operating system (Windows, macOS, Linux) checks its local hosts file before querying public DNS nameservers. By adding an entry, your local web browser sends HTTP requests directly to the target IP, while the rest of the world continues seeing the old hosting provider until you officially update your DNS records.
Method 1: Edit hosts file on Windows 11 / 10 and Windows Server
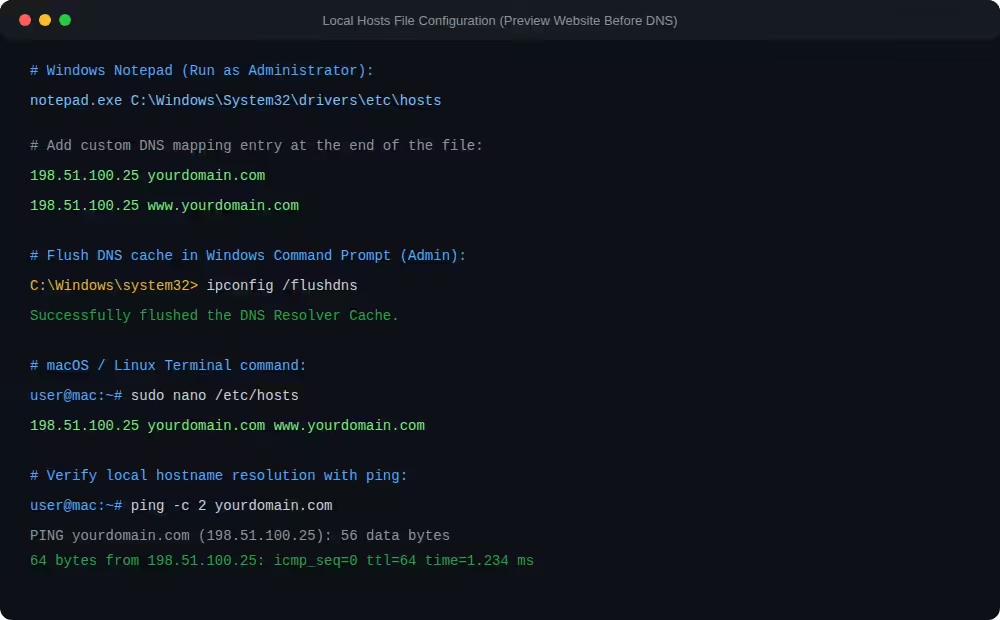
- Click the Start Menu, type
Notepad, right-click the Notepad icon, and select Run as Administrator. - Inside Notepad, click File > Open.
- Navigate to the hosts directory:
C:\Windows\System32\drivers\etc - Change the file filter dropdown in the bottom-right from Text Documents (*.txt) to All Files (*.*).
- Select the hosts file and click Open.
- Scroll to the bottom of the file and add your server IP and domain names on a new line:
(Replace# Point domain to new server IP for pre-migration testing 198.51.100.25 yourdomain.com 198.51.100.25 www.yourdomain.com198.51.100.25with your new server IP andyourdomain.comwith your actual domain.) - Save the file (
Ctrl + S) and close Notepad.
Method 2: Edit hosts file on macOS and Linux
On macOS (Terminal) or Linux desktop:
- Open your Terminal application.
- Open the system hosts file with root privileges:
sudo nano /etc/hosts - Enter your administrator password when prompted.
- Use the arrow keys to navigate to the bottom and append your entry:
198.51.100.25 yourdomain.com www.yourdomain.com - Press
Ctrl + Oand hit Enter to save, then pressCtrl + Xto exit.
Step 3: Flush DNS cache and verify resolution
To ensure your web browser does not load cached DNS records, clear your local resolver cache:
- On Windows (Command Prompt Admin):
ipconfig /flushdns - On macOS (Terminal):
sudo dscacheutil -flushcache; sudo killall -HUP mDNSResponder - On Linux (systemd-resolved):
sudo resolvectl flush-caches
Open your web browser in an Incognito / Private window and visit your domain. You are now browsing directly from your new server.
Step 4: Cleanup (Removing hosts entry after migration)
Once you update your public DNS records (via Cloudflare, cPanel, or your domain registrar) and propagation completes across global DNS servers, reopen your hosts file, delete the temporary line you added, and save the file.
For more web server administration tutorials, explore our guides on How to Install Webmin on Linux and Securing SSH Access.
For high-performance NVMe cloud infrastructure with dedicated IP addresses and 99.9% uptime, explore Aminserve Cloud VPS Hosting and Bare-Metal Dedicated Servers.