The Layer 2 Tunneling Protocol over IPsec (L2TP/IPsec) is a built-in VPN protocol supported natively across Windows 11, Windows 10, and Windows Server without requiring third-party software. By encapsulating data with L2TP and securing the tunnel using 256-bit AES encryption via IPsec, L2TP/IPsec provides robust transport security for remote workers and administrators accessing corporate private networks or browsing securely over public Wi-Fi.
This step-by-step tutorial guides beginners through setting up a native L2TP/IPsec VPN connection on Windows 11 / 10, provides PowerShell automation commands, and fixes the common Error 809 / Error 789 NAT Traversal bug via a single registry tweak. If you are comparing network encryption with full remote workstation control, explore our breakdown on RDP vs VPN for Remote Access.
Prerequisites: Information needed before connecting
Gather the following credentials from your VPN administrator or hosting provider:
- VPN Server Address: Domain hostname (e.g.
vpn.yourdomain.com) or dedicated public IP address. - VPN Type: L2TP/IPsec with pre-shared key.
- Pre-Shared Key (PSK): The shared secret passphrase configured on the VPN gateway.
- Username & Password: Your assigned VPN authentication credentials.
Step 1: Open VPN settings in Windows
- Press
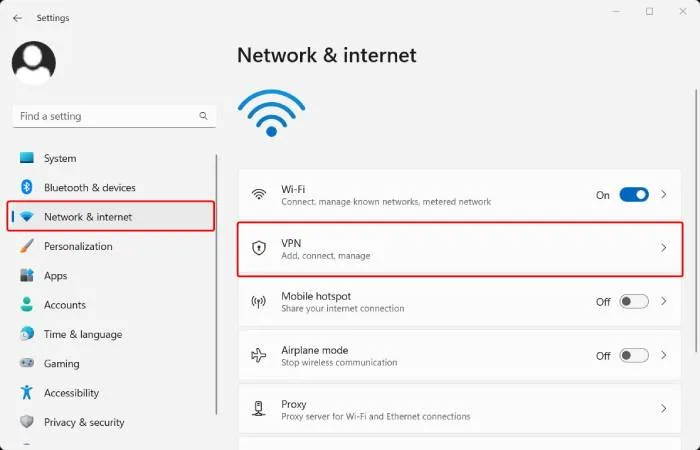
Win + Ion your keyboard to open the Windows Settings window. - In the left sidebar, click on Network & internet.
- Click on the VPN sub-menu in the right pane.
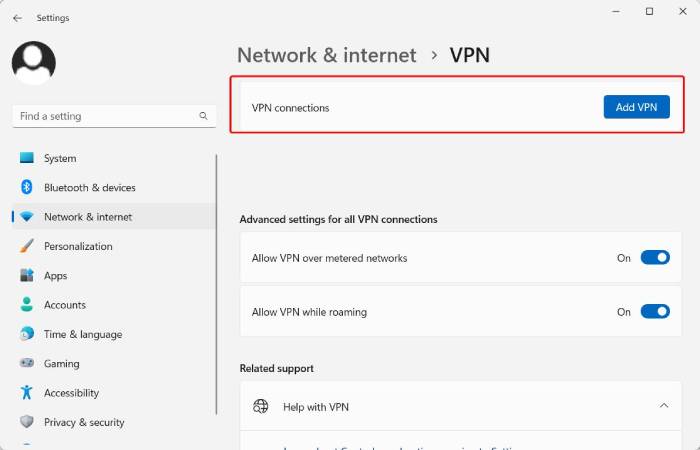
Step 3: Connect and verify your VPN tunnel
- Click the Connect button next to your newly created VPN profile.
- Once connected, the status will change to Connected.
- Verify your outgoing IP address using PowerShell or your web browser to confirm your traffic is routing through the VPN server:
# Check outgoing public IP in PowerShell (Invoke-RestMethod -Uri "https://api.ipify.org?format=json").ip - To disconnect, return to Settings > Network & internet > VPN and click Disconnect.
Troubleshooting: Fix Error 809 / Error 789 (NAT Traversal bug)
If Windows displays “The network connection between your computer and the VPN server could not be established (Error 809)” or “Error 789: The L2TP connection attempt failed because the security layer encountered a processing error”, the cause is Windows disabling IPsec NAT-Traversal when the client or server is behind a router.
Fix it permanently in one PowerShell command (Run as Administrator):
# Fix L2TP Error 809 by enabling IPsec NAT-Traversal in Windows Registry
Set-ItemProperty -Path "HKLM:\SYSTEM\CurrentControlSet\Services\PolicyAgent" -Name "AssumeUDPEncapsulationContextOnSendRule" -Type DWord -Value 2

# Enable and restart IPsec PolicyAgent service
Set-Service -Name PolicyAgent -StartupType Automatic
Restart-Service -Name PolicyAgent -Force
(After running this command, restart your computer once to apply the network stack change.)
Automating VPN setup via PowerShell (One-liner)
For system administrators provisioning multiple Windows Cloud VPS or client machines, create the complete L2TP profile via PowerShell without touching the GUI:
# Create L2TP/IPsec VPN profile via PowerShell
Add-VpnConnection -Name "Aminserve-VPN" `
                  -ServerAddress "198.51.100.10" `
                  -TunnelType "L2tp" `
                  -L2tpPsk "YourSecretPresharedKey" `
                  -AuthenticationMethod Pap,Chap,MSChapv2 `
                  -EncryptionLevel Optional `
                  -RememberCredential $true
If you are also configuring remote server management, see our guides on How to Enable RDP in Windows and Connecting from macOS.
For dedicated unmetered bandwidth, high-speed encrypted tunnels, and 24/7 technical support, explore Aminserve High-Speed VPN Solutions and Dedicated Remote Desktop Hosting.