Losing or forgetting the root administrative password on your Linux VPS, dedicated server, or CentOS / AlmaLinux instance does not require reinstalling the operating system or losing your valuable data. Using the out-of-band VNC Console, you can boot into the GRUB bootloader emergency shell, chroot into the system root, and reset the root password in less than 5 minutes.
This comprehensive recovery guide applies to CentOS 7, CentOS 8/9 Stream, AlmaLinux 8/9, Rocky Linux 8/9, and RHEL installations.
Step 1: Access the out-of-band VNC Console
Because SSH access requires valid credentials, password recovery must be performed via the server’s virtual monitor:
- Log in to the Aminserve Client Area.
- Navigate to your active VPS or Dedicated Server management page.
- Launch the web-based HTML5 VNC Console (or follow our VNC console guide).
Step 2: Reboot the server and interrupt the GRUB bootloader
- From the client portal or VNC menu, click Reboot (or press Ctrl + Alt + Del).
- As soon as the server begins booting and the GRUB menu appears, immediately press the Arrow Up or Arrow Down key to pause the boot countdown timer.
- Highlight your primary kernel (the top entry) and press e on your keyboard to edit boot parameters.
Step 3: Modify kernel boot arguments (rd.break or init)
- Use your arrow keys to scroll down through the configuration lines until you locate the line starting with
linux16,linuxefi, orlinux. - Move your cursor to the end of this line.
- Add a space and append the emergency break parameter:
rd.break(Alternatively, for older CentOS 7 kernels, locate the
roparameter, change it torw, and appendinit=/sysroot/bin/sh). - Press Ctrl + X to boot the kernel with your modified arguments.
Step 4: Remount sysroot and chroot into the system
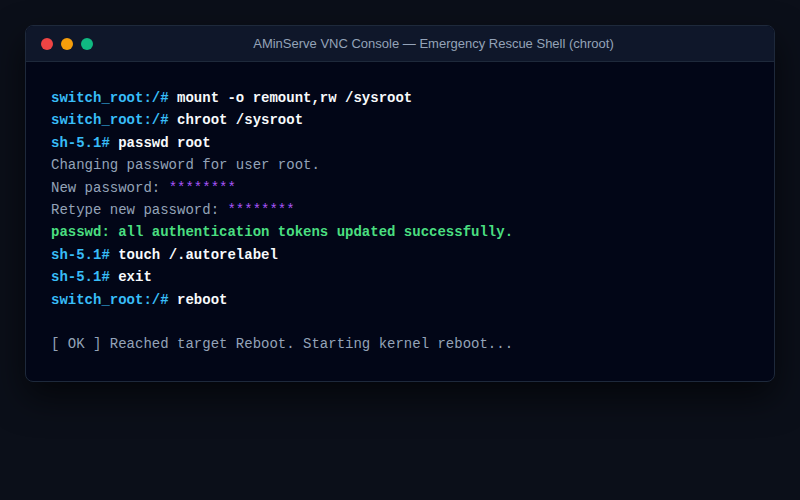
The system will drop you into a switch_root:/# emergency ramdisk shell. Execute the following commands in order:
- Remount the target root filesystem in read-write mode:
mount -o remount,rw /sysroot - Switch root execution context into your installed operating system:
chroot /sysroot - Your shell prompt will change to
sh-5.1#orbash-4.2#.
Step 5: Set the new root password
- Execute the password utility:
passwd root - Type your new secure password and press Enter.
- Retype the password to confirm. You will see the confirmation message: “passwd: all authentication tokens updated successfully.”
Step 6: Trigger SELinux autorelabel (Critical)
On RHEL, CentOS, AlmaLinux, and Rocky Linux, SELinux security contexts must be updated for the new shadow file. If you skip this step, SELinux will block root authentication on normal boot:
touch /.autorelabelStep 7: Exit and reboot to normal mode
- Exit the chroot environment:
exit - Reboot the server:
reboot
During startup, the system will perform an automated SELinux relabeling process (takes 1–2 minutes) and reboot into the normal login screen. You can now connect via SSH using your new root password.
For high-performance, developer-ready Linux cloud infrastructure with automated snapshots and out-of-band management, explore Aminserve Linux and Windows VPS hosting with 1Gbps ports and 24/7 dedicated support.