Surfing the internet through a proxy server provides increased security, anonymity, and the ability to bypass geographic restrictions on certain websites. One way to set up a proxy is by using a Linux VPS (Virtual Private Server) and SSH tunneling.
In this beginner-friendly tutorial, we’ll cover how to get started with using your Linux VPS as a secure proxy for daily web browsing.
Why Use a VPS Proxy?
Here are some of the benefits of routing your traffic through a VPS proxy:
- Hide your home IP address and location while browsing.
- Encrypted SSH tunnel keeps your connection secure from snooping.
- Access blocked or censored websites by proxying through another country.
- Avoid bandwidth throttling or restrictions by your ISP.
- Extra layer of privacy and anonymity for your browsing.
Getting a Linux VPS
The first step is to get a Linux VPS configured and ready to use as a proxy. Here we recommend getting a basic VPS plan with around 1GB of RAM from a provider like Aminserve.
Debian is a good Linux distribution that works well for running a proxy server. The VPS from AminServe will come pre-configured so you don’t need to worry about setting up things like static IP, firewall rules, SSH keys etc.
Once you have the VPS login credentials, you can move on to the next step of setting up the proxy client.
Using PuTTY to Create the SSH Tunnel
On your Windows computer, you need a SSH client to create an encrypted tunnel to the VPS. For this, we’ll use the free and popular PuTTY application.
Download and Install PuTTY
Go to the PuTTY download page and get the latest installer for Windows. Run the installer and follow the prompts to install PuTTY.
Configure the SSH Tunnel
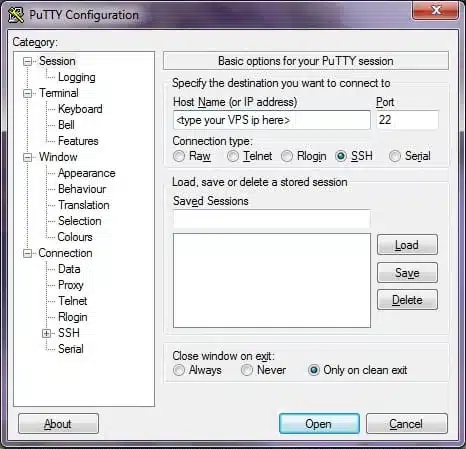
- Launch the PuTTY application.
- Enter the IP address of your VPS in the Host Name field.
- Go to Connection > SSH > Tunnels
- In the Source port field, enter a port number like 1080
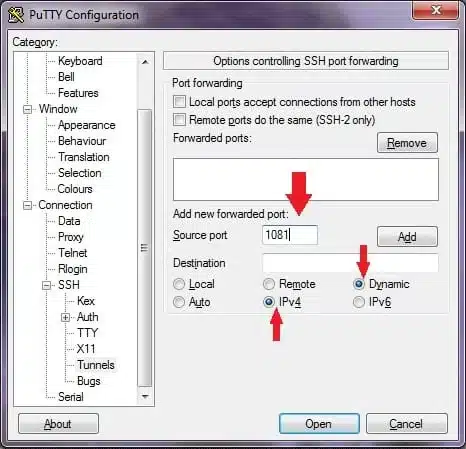
- Select the Dynamic radio button and leave the Destination field empty.
- Click Add to add the tunnel.
- Click Open to connect and log into your VPS.
Connect via SSH
- Enter your VPS login username and click Open
- When prompted, enter the VPS password

You will be logged into your VPS CLI. Leave this PuTTY window open in the background. The SSH tunnel is now active.
Configure Browser Proxy Settings
With the SSH tunnel running, you now need to configure your Windows applications and browsers to route their traffic through the tunnel.
Google Chrome
- Click the 3-dot menu > Settings > Proxy
- Select Manual proxy setup
- Enter 127.0.0.1 for SOCKS host
- Enter your tunnel port (1080) for SOCKS port
- Click OK to save changes.
Mozilla Firefox
- Click the 3-line menu > Options > General > Network Proxy
- Select Manual proxy configuration
- Enter 127.0.0.1 for SOCKS host
- Enter your tunnel port (1080) for SOCKS port
- Click OK
Microsoft Edge
- Click the 3-dot menu > Settings > Cookies and site permissions
- Under Proxy, click Change
- Select Manual proxy setup
- Enter 127.0.0.1 for Address and your tunnel port for Port
- Click Save
Opera
- Click the Opera menu > Settings > Proxy
- Select Use manual proxy configuration
- Enter 127.0.0.1 for Address and your tunnel port for Port
- Click OK
Safari
- Click Safari > Preferences > Advanced
- Select Proxies > Change Settings
- Select Socks Proxy and enter 127.0.0.1 for Server and your tunnel port for Port
- Click Ok > Apply
Testing the VPS Proxy
You can now test that your web traffic is being routed through the VPS by visiting a website like IPLeak.net to confirm the VPS IP address is shown instead of your home IP.
The SSH tunnel will persist in the background until you manually close the PuTTY window. All your browser traffic will now be proxied through the encrypted tunnel for increased privacy and security during your online activities.
Let me know if you would like me to modify or expand any part of this updated tutorial. I can also work on improving the formatting and adding images. Please provide any other feedback you may have.