What is DNS and how to change DNS?

DNS name came from Domain Name System. The main function of DNS is translating domain name to IP.
Each website in internet uses a server to host its materials and each server may have one or multiple IPs. There might thousands website on a server and the server owner can assign 1 IP to many websites. If a website uses a dedicated IP, you can access that website usually by entering their IP in your browser url bar. But what if an IP was assigned to more than one website/domain? That is when DNS comes to play.
How DNS works?
When you enter an address in your browser url bar, the DNS is responsible for the address to IP translation. It will connect to the server hosting the website and asks about the contents.
How can I use DNS?
Your computer usually uses the DNS provided by your ISP, but you can change your DNS as well. At AMinServe we usually use CloudFlare 1.1.1.1 or Google 8.8.8.8 DNS by default. In other words, when you receive your service it already has it’s DNS set.
How can I find free DNS server IP?
There are many websites that lists free DNS servers. We recommend https://public-dns.info. There you can find DNS server IP based on country and city.
How can I change my DNS in Windows or RDP?
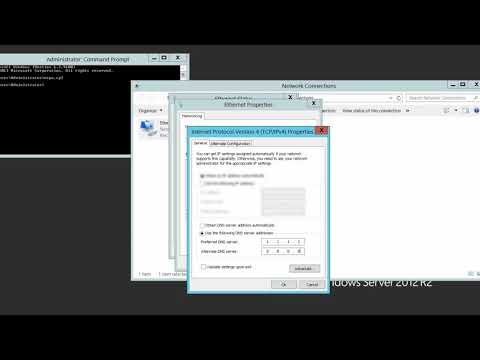
Since AMinServe RDP and Windows VPS are all with administrator access, you can change your DNS at any time. To change the DNS, you need to open network configuration panel and change the DNS server IP there. Please remember you should not change the IP settings, only the DNS settings should be changed. Follow these easy 6 steps or watch the video attached:
1- Open CMD (command run or command prompt). You can find CMD in start menu. Open start menu and start typing “cmd”.
2- In the CMD type “ncpa.cpl” and hit Enter. This will bring up network configuration panel.
3- Double-click on the network card. Click on properties.
4- Choose “Internet Protocol Version 4” and and click on properties.
5- Choose “Use the following DNS server addresses” and fill the two fields with your preferred DNS server IP (Choose two dns server from https://public-dns.info/#countries). Hit ok, ok and close.
6- Open CMD again (like step 1) and type “ipconfig /flushdns”, hit enter.
You are done. To make sure it is applied correctly, restart your Windows. Restart or your RDP if you are changing the DNS in RDP.
Video tutorial: