When managing a Windows VPS or RDP server for collaborative workflows, automated software bots, or multi-user access, creating dedicated local user accounts prevents sharing master administrator credentials. Isolating users into standard accounts enforces the principle of least privilege, limits exposure to accidental malware execution, and allows administrators to revoke individual user sessions without disrupting active production workloads.
This technical guide provides step-by-step instructions for creating local user accounts, adding them to the Remote Desktop Users group, and managing permission boundaries on Windows Server 2025, 2022, 2019, 2016, and Windows 11 / 10 using elevated Command Prompt, PowerShell one-liners, and the Computer Management GUI. If you need to update access credentials later, see our guide on How to Change Windows Password on RDP & VPS.
Method 1: Command Prompt (Fastest — 2-command setup)
The fastest and most reliable method to create a user and grant RDP rights is through elevated Command Prompt (CMD):
- Click the Start menu, type
cmd, right-click Command Prompt, and select Run as administrator. - Create the new local user account (replace
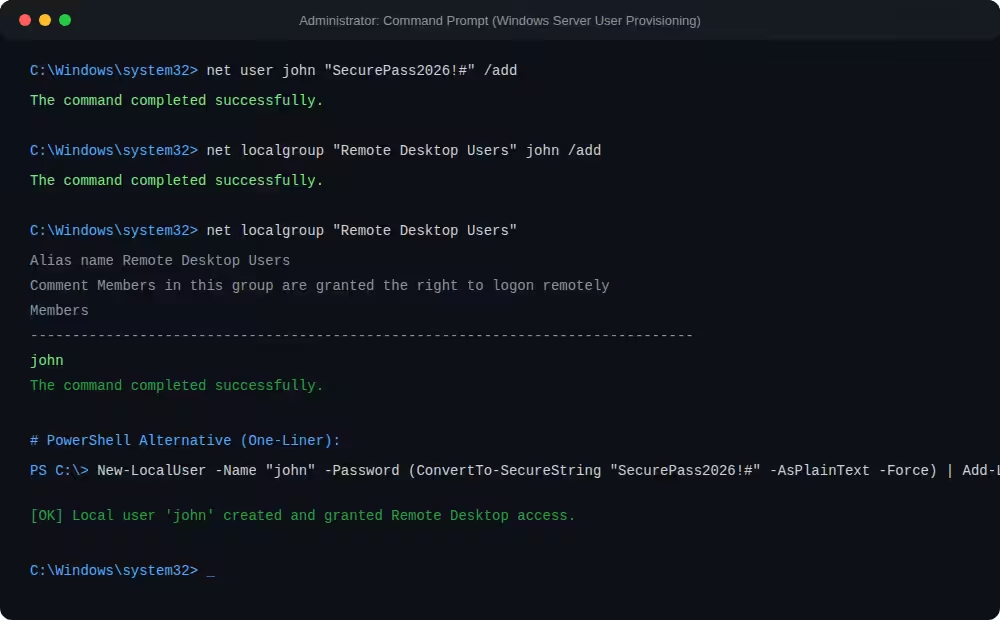
johnwith your username andSecurePass2026!#with your chosen password):# Create local user account net user john "SecurePass2026!#" /add - Grant the account remote access permissions by adding it to the
Remote Desktop Usersgroup:# Grant Remote Desktop login permissions net localgroup "Remote Desktop Users" john /add - Confirm group membership:
# Verify active members of Remote Desktop Users
net localgroup "Remote Desktop Users"
Method 2: Automate user creation via PowerShell (One-liner)
For automated provisioning across multiple Windows Cloud VPS nodes, execute this unified PowerShell command:
# Create user and assign RDP group in one PowerShell pipeline
New-LocalUser -Name "john" -Password (ConvertTo-SecureString "SecurePass2026!#" -AsPlainText -Force) -PasswordNeverExpires $true | Add-LocalGroupMember -Group "Remote Desktop Users"
Method 3: Windows Computer Management GUI (lusrmgr.msc)
For administrators who prefer the graphical interface on Windows Server or Windows Pro:
- Press
Win + R, typelusrmgr.msc, and hit Enter to open Local Users and Groups. - Click on the Users folder, right-click empty space, and select New User.
- Fill in User name, Password, and uncheck “User must change password at next logon” (check “Password never expires” for service accounts). Click Create.
- Click on the Groups folder in the left pane, double-click Remote Desktop Users, and click Add.
- Type your new username (e.g.
john), click Check Names, and click OK twice to confirm.
Step 4: Verify login and active RDP sessions
- Open a new Remote Desktop Connection window (
mstsc) on your local computer. - Enter your server IP address and click Connect.
- Select More choices > Use a different account and log in with your newly created username and password.
- Verify your session initializes cleanly. Keep your primary administrator session open during testing to avoid lockouts.
Security hardening: Least privilege and account lifecycle
- Standard Non-Admin Privilege: Standard RDP users cannot install kernel drivers, modify firewall rules, or view files in other users’ profile directories (
C:UsersAdministrator). - Temporary Disabling: Rather than deleting accounts when contractors depart, disable them instantly:
# Disable user account temporarily net user john /active:no - Account Deletion:
# Permanently remove user and revoke access
net user john /delete
For additional RDP security and multi-client access, explore our guides on How to Enable RDP in Windows Server & 11, Connecting from macOS, and Connecting from iOS.
For dedicated hardware with enterprise security firewalls, unmetered bandwidth, and 24/7 technical support, explore Aminserve High-Speed RDP Hosting, Windows Cloud VPS, and Bare-Metal Dedicated Servers.